Simple Git Repos for Small TeamsGet your team up and going with git to manage development projects.
The last development team I worked on was not using any version control (source code management) tools and rather just keeping project folders scattered around on an internal network drive. This isn't so bad when there are only one or two developers, but as the team began to expand, we needed a better solution. I proposed that we begin using git to help streamline our workflow and to avoid stepping on each other's toes when making changes or adding new features to a project. The team agreed and I lead the effort of getting our colleagues set up with git, formulating some type of workflow, and training them on how to use it. This article sheds some light on how we did it.
What is Git?
From their website:
Git is a free and open source distributed version control system designed to handle everything from small to very large projects with speed and efficiency. Git is easy to learn and has a tiny footprint with lightning fast performance. It outclasses SCM tools like Subversion, CVS, Perforce, and ClearCase with features like cheap local branching, convenient staging areas, and multiple workflows.
Install Git
First things first, you must have Git on your machine before using Git - crazy concept, I know.
Choose a terminal and get familiar with it
You'll be running Git commands from a command line terminal. Pick one that suites your needs and get familiar with navigating your file system, manipulating files and directories, and of course common Git commands that you will use daily. Yes, your computer will come with a command line tool, but there are many out there with improved features that make your development life easier.
Ok great, so which one should you go with?
I personally use both options listed below when switching back and forth between my desktop pc and macbook and have nothing bad to say about either.
For Mac OS use:
iTerm2
For Windows use:
cmder
Or choose an IDE with an integrated terminal.
I highly recommend going a modern IDE that has an integrated terminal, like VS Code, I now rarely touch the programs listed above and spend 90% of my time with a terminal in VS Code instead of switching back and forth between separate windows. Also, VS Code runs on both Mac OS and Windows, so there's nothing holding you back. At the time when we were on-boarding Git, this wasn't available and used cmder since we were on Windows machines.
Creating Repositories
Now that you have git installed, you can add it to existing projects and initialize it on all projects moving forward.
Decide where your projects will live.
Since our network had tight security, we weren't able to access GitHub which most development teams use. Luckily we did have access to a shared network drive where we were keeping our work anyway. We reorganized our project folder structure and chose a place to store all of our repositories. To accomplish this we had to set up bare repositories.
Setting Up a Bare Repository
A bare repository is a repo that lives on a server and acts as a sharing repository and single source of truth for your projects. It's just like using GitHub but without the fancy user interface. Yes, GitHub has a lot of great features, but if you can't use it, a bare repo is the next best thing. Here's how to get that done:
Create a bare repo on your server
Run this command from anywhere in your terminal
git init --bare /path/to/your/project/barerepo.git
You no longer have to worry about that file, you cant access your project assets from there, it is only a bare repository file (.git) that can only be cloned and pushed to.
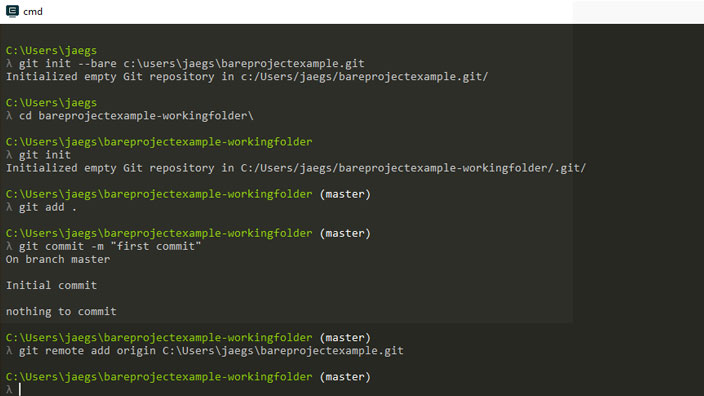
Set up your working folder
Go to your project folder, initialize Git, make your first commit, and then link it to the bare repo.
$ cd /path/to/your/project
$ git init
$ git add .
$ git commit -m "first commit"
$ git remote add origin /path/to/your/project/barerepo.git
$ git push -u origin master
That's it! You now have a bare repo linked to your local project working folder.
Workflow
Since the bare repo is our master branch and wanting to keep things simple, the general workflow we decided on is as follows:
-
Create project locally (working folder) with whatever assets you have at the time, make sure to include a
.gitignorefile. -
Create a bare repo on the shared server.
-
Add git to the working folder, make first commit, link to bare repo (steps from above).
-
Share the repo's path with teammates so they can clone the project.
git clone /path/to/the/barerepo.git /path/to/your/local/workingfolder -
Before pushing changes to a repo fetch origin and rebase
git fetch origin
git pull --rebase origin master -
Solve any merge conflicts, if you have any questions or uncertainties, contact the team member who commited the work where the conflict is stemming from.
-
Push changes to the repo.
git push origin master
Wrapping Up
And that's all there is to it. We followed the above workflow on all of our projects moving forward rather painless. The only time issues arose is when forgetting to fetch the latest files and rebase your changes onto them, and the occasional merge conflict. If you are looking for an excellent guide to help your teammates conceptualize git, interact with repositories, and solve merge conflicts look no further than the Atlassian git tutorial.